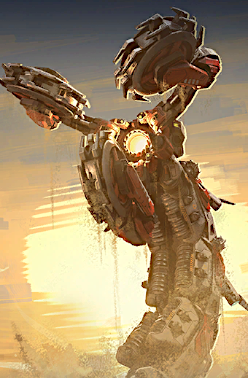
Mastering the Sandworm: Mechabellum’s Subterranean Menace
The Sandworm is a burrowing behemoth that disrupts enemy formations with unpredictable dives and devastating melee strikes. Its ability to evade damage underground and synergize with aerial units makes it a versatile late-game threat, but reliance on burrow cycles demands careful positioning and tech timing.


Deployment & Core Value
Aerial Protector: Use Sandstorm Tech to shield Wasps from anti-air (Mustangs, Fortress Barrage).
Backline Assassin: Burrow to bypass chaff and delete key units (Stormcallers, Vulcans, Marksmen).
Replicate Spam: Mass worms in one lane with Replicate Tech to overwhelm defenses through sheer numbers.
Zone Disruptor: Force enemies to split resources between surface threats and subterranean dives.
Weaknesses:
Vulnerable to War Factories and Fortress Launcher Overload during surface phases.
Burrow cycles are disrupted by constant chaff drip (Crawlers/Fangs).
Struggles vs. Overlord Ground Cannons or Phoenix Charged Shots during emergence.
Strategic Timing & Matchups
Early Game:
Deploy 1 Sandworm to counter Mustang-heavy boards or protect early Wasps.
Use Mobile Beacon to reposition and avoid early Melting Point focus.
Mid-Game:
Tech Transition: Add Sandstorm to protect air units or Replicate for lane pressure.
Backline Dive: Burrow to assassinate Stormcallers/Vulcans, then retreat underground.
Late Game:
Mass Worm Push: Cluster 3+ Sandworms with Replicate + Burrow Speed Tech for unstoppable waves.
EMP Synergy: Pair with EMP units to lock enemies in place during emergence.
Countering Sandworm: Disrupt & Bury
Early Counters:
Chaff Flood: Drip-feed Crawlers/Fangs to stall burrow cycles.
War Factory Turrets: Melt Sandworms during surface phases with AoE.
Mid-Game Counters:
Fortress + Launcher Overload: Bombard emergence points with unstoppable missiles.
Phoenix Charged Shots: Snipe Sandworms as they surface.
Late Counters:
Overlord Ground Cannons: Focus-fire Sandworms during brief surface windows.
Scorpion Acid: Apply lingering damage that persists through burrows.
Pro Tips:
Deploy Mobile Beacons to bait Sandworms into EMP traps.
Use Steel Balls with Energy Absorption to tank strikes and outheal damage.
Sandworm Builds: Tech & Synergy
Sandstorm Guardian:
Tech: Sandstorm + Burrow Speed.
Role: Protect Wasps/Overlords while diving priority targets.
Synergy: Pair with Phoenix to snipe distracted anti-air.
Replicate Swarm:
Tech: Replicate + HP Upgrades.
Role: Flood a single lane with burrowing waves.
Risk: Requires Stormcallers to clear enemy chaff blocking emergence points.
Backline Assassin:
Tech: Burrow Speed + Damage Amplifiers.
Role: Delete Vulcans/Stormcallers before they scale.
Synergy: Combine with Hackers to steal chaff and ensure clean dives.
Key Philosophy
The Sandworm is a psychological weapon—its burrows force enemies to play reactively. Use it to punish static backlines or protect air armies, but never overcommit without Replicate Tech. Prioritize disrupting enemy anti-burrow tools (War Factories, Fortresses), and abandon the strategy if they hard-counter with Phoenixes or Overlords. Adaptability is key: let the Sandworm’s unpredictability create openings, but always have a backup plan when the enemy digs deeper.
Mobility - Ground
Giant - Yes
Cost - 400
Unlock cost - 200
Units - 1
HP - 48645
Attack - 8324
Target - Ground
Attack Interval - 2.5s
Splash Damage - 12.0m
Burst Damage - 8324
Max DPS - 3330
Range - Melee
Speed - 16m/s


Tech Upgrades


Armor Enhancement (350)
HP is increased by 50% and blocks 60 damage when attacked. The damage-blocking effect increases by 60 with each level


Mechanical Division (350)
Destroyed Sandworm creates 4 level 1 Larvae to continue fighting
Mechanical Rage (200)
Increases the movement speed of units by 4m/s and reduces attack interval by 0.8s
Anti Air (100)
Enables the Sandworm to attack aerial targets


Replicate (200)
Each time the Sandworm emerges from the ground, it creates 1 Larva


Sandstorm (350)
When the Sandworm burrows out of the ground, it creates a sandstorm with a 120-meter radius that lasts for 10 seconds. Units within the sandstorm have their attack range reduced by 50%, and damage taken from ranged attacks is reduced by 30%


Underground Maintenance (250)
While burrowed, the Sandworm restores 15% of its max HP per second
Follow
© 2025. MechaTactics. Not affiliated with the game Mechabellum.
Resources
Donate
